ORTHOGRAPHIC PROJECTIONS
A projection is defined as an image or a drawing of an object made on a plane. All drawings used in the field of engineering are based on the principles of projection.
PROJECTIONS OF POINTS
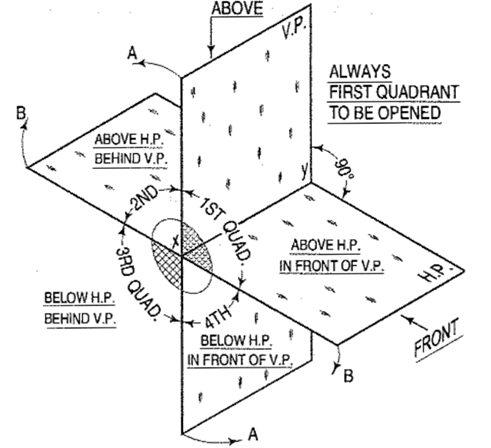
A point is defined as a geometrical element that has no dimension. In engineering drawing, a point is represented by a dot. A point lying in the space can be defined in one of the following positions with respect to the principal planes.
CONVENTIONS FOLLOWED
(1) In drawing practice, capital letters A,B,C etc are used to represent objects in space.
(2) Their top views are represented by small letters a,b,c etc.
(3) The front views are represented by small letters with dashes a’,b’,c’, etc.
(4) These letters are used to represent a point, ends of a straight line, corners of solid etc.
(5) Actual projections in top and front views are drawn in thick lines, construction lines and projectors are drawn using thin lines.
(6) Top view is also known as plan and front view is known as elevation.
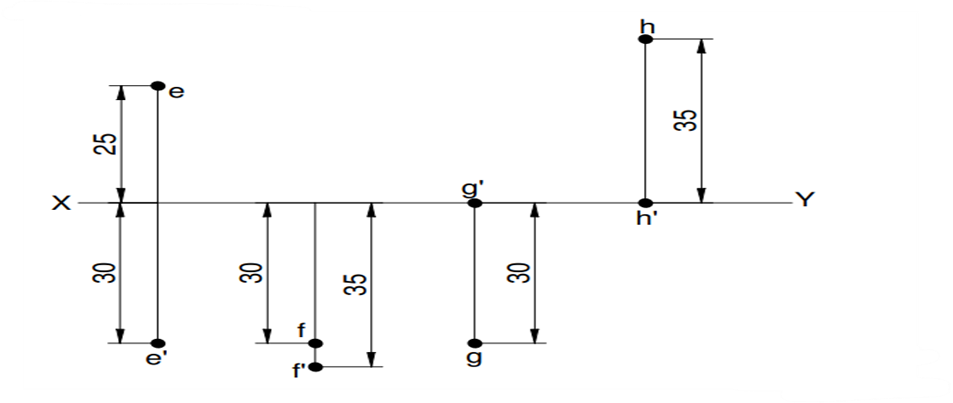
Problem: Draw the projections of the following points on the same XY line, keeping convenient distance between each projectors. Name the quadrants in which they lie.
E – 30 mm below HP and 25 mm behind VP.
F – 35 mm below HP and 30 mm infront of VP.
G – on HP and 30 mm infront of VP. H – on HP and 35 mm behind VP.
H – on HP and 35 mm behind VP.
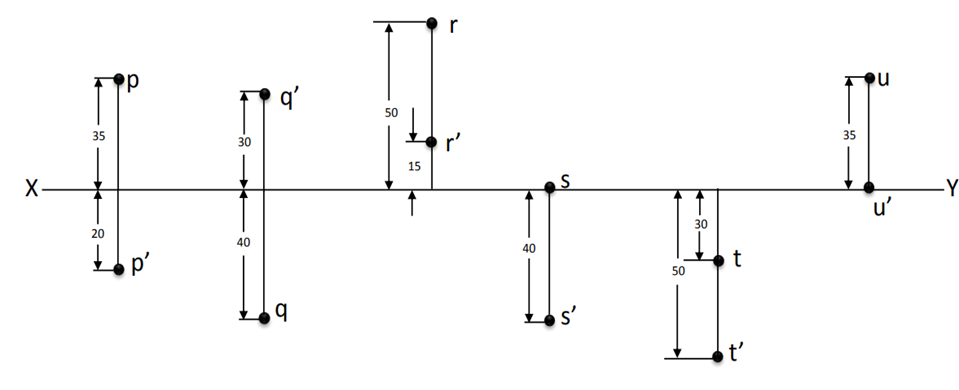
Problem: Mark the projections of the following points on a common reference line :
PROJECTIONS OF STRAIGHT LINES
The straight line can also be defined as the shortest distance between two points. The projections of straight lines can be drawn by joining the respective projections of its end points.
ORIENTATION OF A STRAIGHT LINE
A straight line may be in one of the following positions.
LINE PARALLEL TO BOTH H.P. AND V.P.
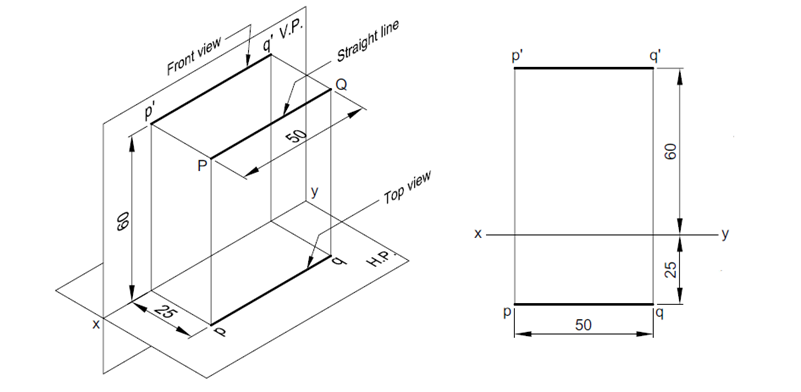
Problem: A 50 mm long line PQ is parallel to both the H.P. and the V.P. It is 25 mm in front of the V.P. and 60 mm above the H.P. Draw its projections and determine the traces.
LINE PERPENDICULAR TO H.P.
Problem: A 60 mm long line PQ has its end P 20 mm above H.P. The line is perpendicular to the H.P. and 40 mm in front of the V.P. Draw its projections and locate the traces.

LINE PERPENDICULAR TO V.P.
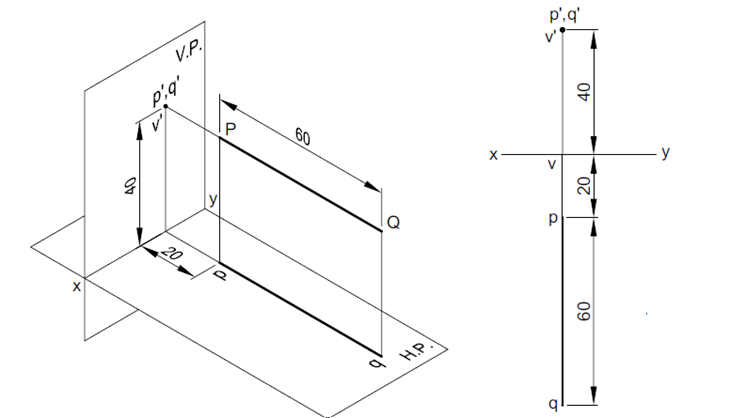
Problem: A 60 mm long line PQ has its end P 20 mm in front of the V.P. The line is perpendicular to the V.P. and 40 mm above the H.P. Draw the projections of the line and determine its traces.
LINE INCLINED TO H.P. AND PARALLEL TO V.P.
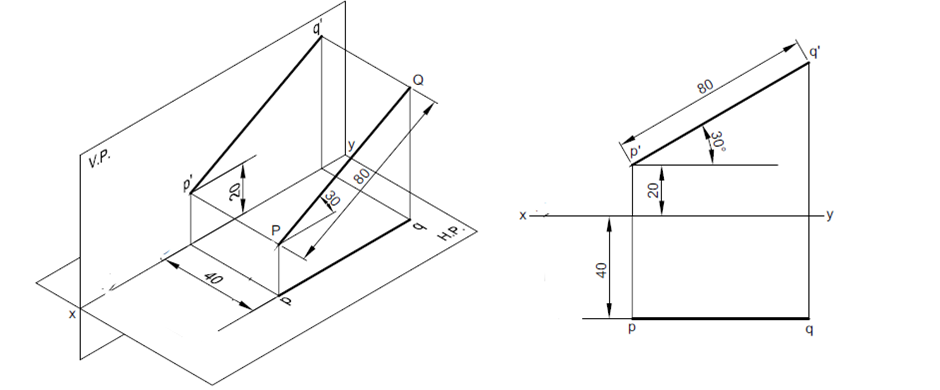
Problem: A 80 mm long line PQ has end P 20 mm above H.P. and 40 mm in front of the V.P. The line is inclined at 30° to the H.P. and is parallel to the V.P. Draw the projections of the line and determine its traces
LINE INCLINED TO V.P. AND PARALLEL TO H.P.
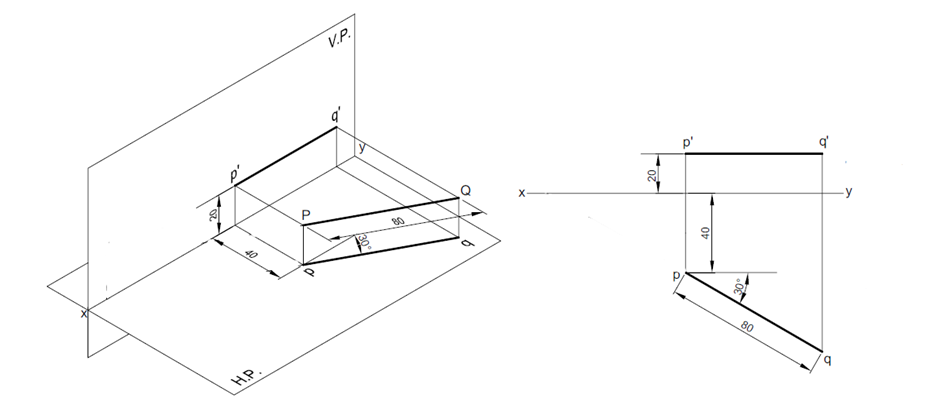
Problem: An 80 mm long line PQ is inclined at 30° to the V.P. and is parallel to the H.P. The end P of the line is 20 mm above the H.P. and 40 mm in front of the V.P. Draw the projections of the line and determine its traces.
LINE IN FIRST ANGLE AND INCLINED TO BOTH THE REFERENCE PLANES
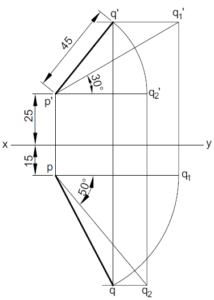
Problem: A 70 mm long line PQ is inclined at 30º to the H.P. The end P is 15 mm in front of the
V.P. and 25 mm above the H.P. The front view of the line measures 45 mm. Draw the projections of the
line PQ and determine its true angle of inclination with the V.P.
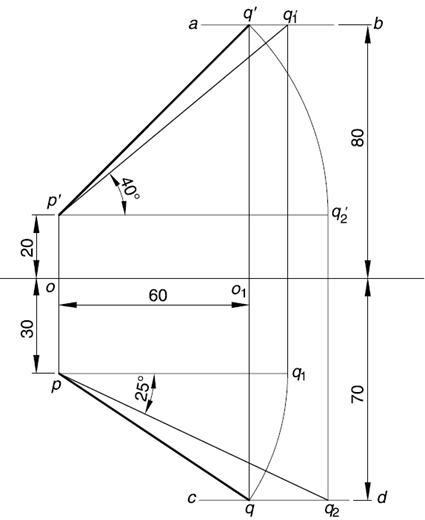
Problem: A straight line PQ has its end P 20 mm above the H.P. and 30 mm in front of the V.P. and the end Q is 80 mm above the H.P. and 70 mm in front of the V.P. If the end projectors are 60 mm apart, draw the projections of the line. Determine its true length and true inclinations with the reference planes.
PROJECTIONS OF PLANES
In this topic, we deal with two-dimensional objects called planes. Planes have length, breadth and negligible thickness.
ORIENTATION OF PLANES
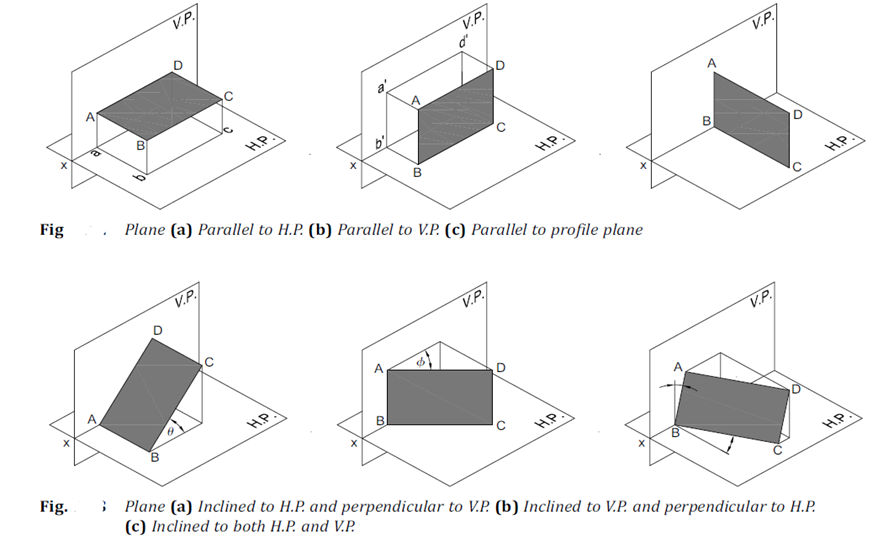
PLANE PARALLEL TO H.P.
Problem: A square plane of side 40 mm has its surface parallel to and 20 mm above the H.P. Draw its projections when (a) a side is parallel to the V.P., (b) one side is inclined at 30° to the V.P. and (c) all sides are equally inclined to the V.P

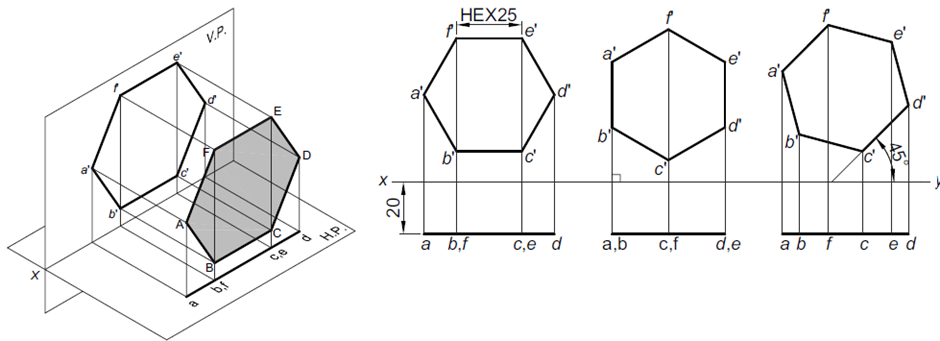
PLANE PARALLEL TO V.P.
Problem: A hexagonal plane of side 25 mm has its surface parallel to and 20 mm in front of V.P. Draw its projections, when a side is (a) parallel to the H.P., (b) perpendicular to the H.P., (c) inclined at 45° to the H.P.
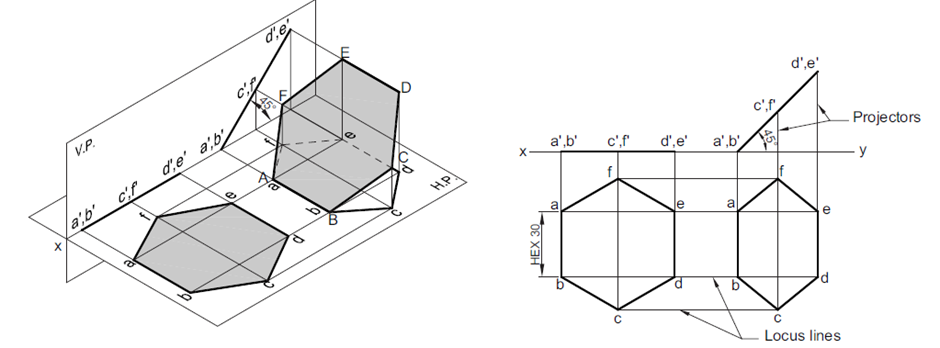
PLANE INCLINED TO H.P. AND PERPENDICULAR TO V.P.
Problem: A hexagonal plane of side 30 mm has an edge on the H.P. The surface is inclined at 45° to the H.P. and perpendicular to the V.P. Draw its projections.
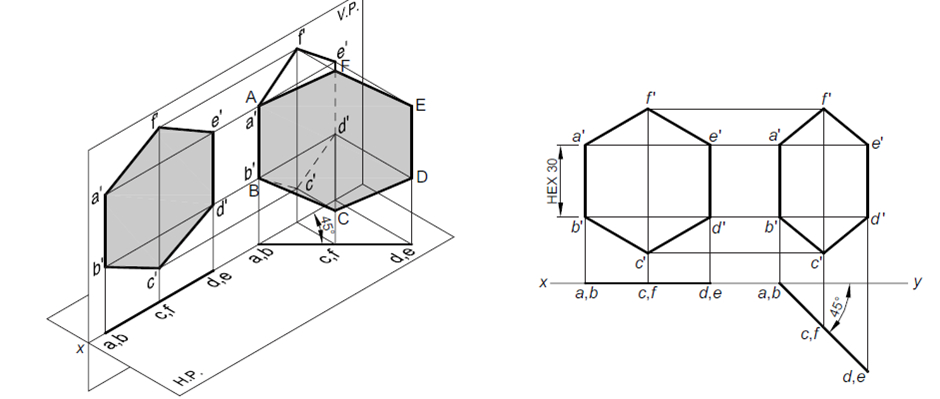
PLANE INCLINED TO V.P. AND PERPENDICULAR TO H.P.
Problem: A hexagonal plane of side 30 mm has an edge in the V.P. The surface of the plane is inclined at 45° to the V.P. and perpendicular to the H.P. Draw its projections.
PLANE INCLINED TO BOTH THE REFERENCE PLANES
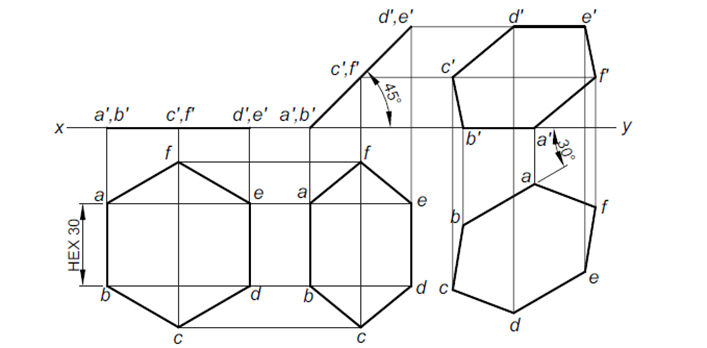
Problem: A hexagonal plane of side 30 mm has an edge on the H.P. Its surface is inclined at 45° to the H.P. and the edge on which the plane rests is inclined at 30° to the V.P. Draw its projections
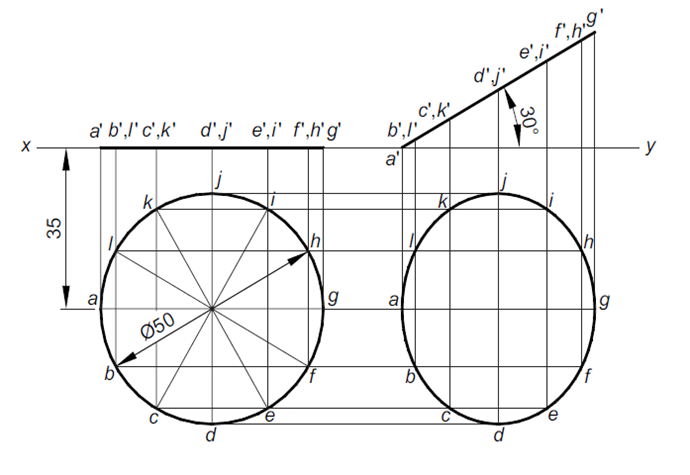
Problem: A circular plane of diameter 50 mm is resting on a point of the circumference on the H.P. The plane is inclined at 30° to the H.P. and its centre is 35 mm in front of the V.P. Draw its projections.
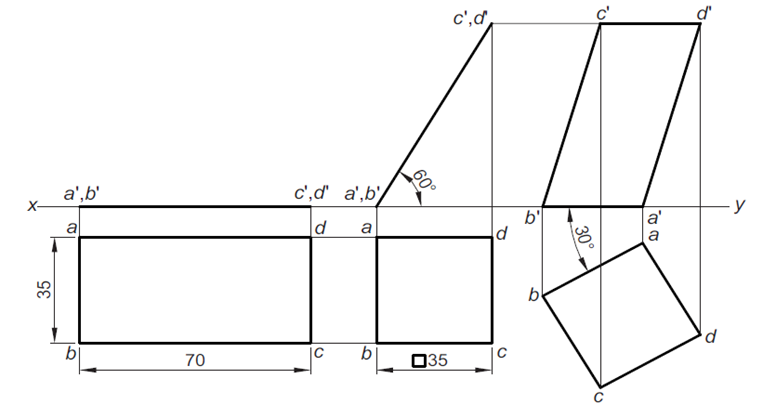
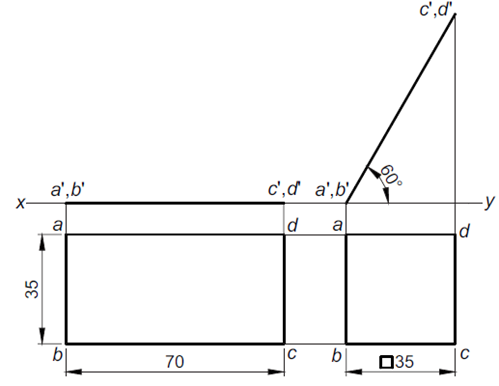
Problem: A rectangular plane of sides 70 mm and 35 mm has a shorter side on the H.P. The surface of the plane is inclined at 60° to the H.P. and perpendicular to the V.P. Draw its projections.
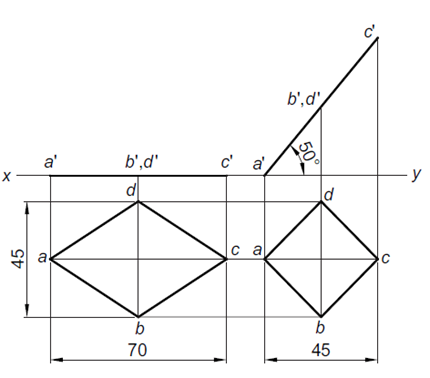
Problem: A rhombus of diagonals 70 mm and 45 mm is placed on an end of the major diagonal on the H.P. Its surface is inclined at 50° to the H.P. and perpendicular to the V.P. Draw its projections.
Problem: The top view of a plane whose surface is perpendicular to the V.P. and inclined at 45° to the H.P. is a circle of diameter 50 mm. Draw the projections of the plane and determine its true shape.
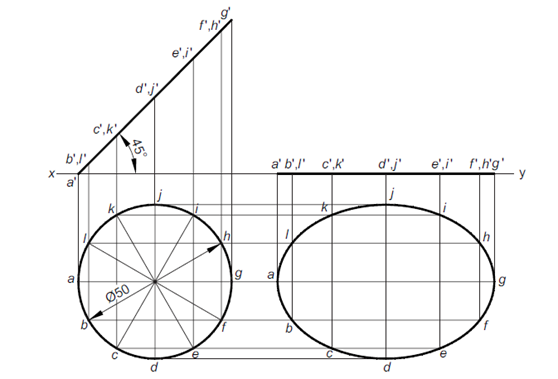
Problem: A circular plane of diameter 50 mm is resting on a point of the circumference on the V.P. The plane is inclined at 30° to the V.P. and the centre is 35 mm above the H.P. Draw its projections.

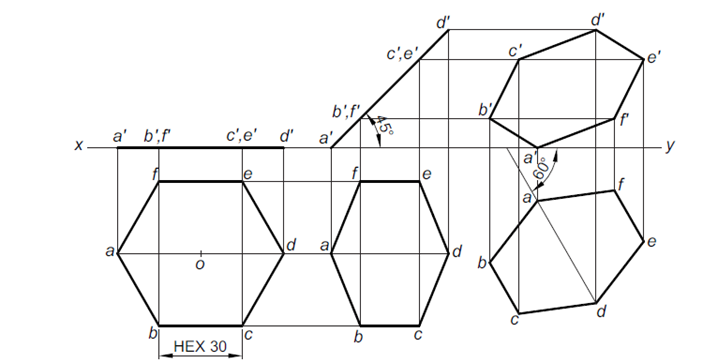
Problem: A hexagonal plane of side 30 mm has a corner on the ground. Its surface is inclined at 45° to the H.P. and the top view of the diagonal through the corner which is in the H.P. makes an angle of 60° with the V.P. Draw its projections.
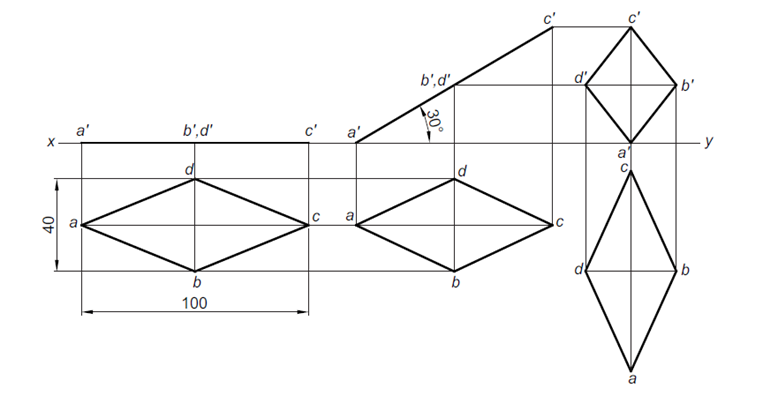
Problem: The diagonals of a rhombus measure 100 mm and 40 mm. The longer diagonal is inclined at 30° to H.P. with an end in H.P. and the smaller diagonal is parallel to both the principal planes. Draw its projections.
Problem: A rectangular plane of edges 35 mm and 70 mm is resting on an edge in the H.P. The surface is inclined to the H.P. such that the top view appears as a square. Draw its projections when the edge resting on the H.P. is inclined at 30° to the V.P.
